

Hey there! As a supplier of water heating tubular heaters, I'm stoked to share with you how to install one in a closed-loop water system. It might sound a bit technical, but don't worry – I'll break it down step by step.
First off, let's talk about why you'd want to use a water heating tubular heater in a closed-loop system. Closed-loop water systems are pretty common in things like industrial processes, HVAC systems, and even some home heating setups. They circulate water in a continuous loop, and a water heating tubular heater can help maintain the right temperature of that water.
What You'll Need
Before you start the installation, you gotta gather the right tools and materials. Here's a list of the essentials:
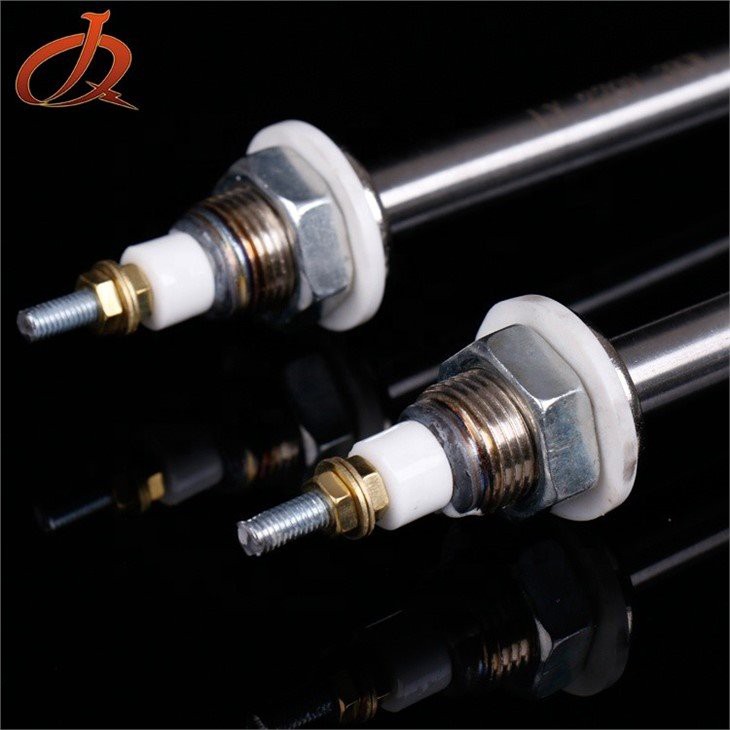
- Water heating tubular heater: Obviously, you need the heater itself. We offer a variety of options, like the Large Power Super Effective Energy Electric Solar Heater and the U Shape Stainless Steel Heater. Make sure to pick one that suits your system's requirements in terms of power, size, and material.
- Pipe fittings: Depending on your system, you'll need the right fittings to connect the heater to the pipes. This could include elbows, tees, and couplings.
- Wrenches: A set of wrenches will be essential for tightening the fittings. You'll probably need both adjustable wrenches and socket wrenches.
- Sealant: To prevent leaks, you'll need a good-quality pipe sealant. Teflon tape is a popular choice, but there are also liquid sealants available.
- Electrical tools: Since the heater is electrical, you'll need tools like wire strippers, pliers, and a voltage tester.
- Safety gear: Don't forget to wear safety glasses and gloves to protect yourself during the installation.
Step 1: Prepare the System
Before you install the heater, you need to make sure the closed-loop water system is ready. First, shut off the power to the system to avoid any electrical hazards. Then, drain the water from the section of the system where you'll be installing the heater. This will prevent water from spilling out when you make the connections.

Next, clean the pipes where you'll be attaching the heater. Remove any dirt, debris, or old sealant. This will ensure a good seal and prevent leaks.
Step 2: Mount the Heater
Once the system is prepared, it's time to mount the heater. Most water heating tubular heaters come with mounting brackets or flanges. Use these to attach the heater to a suitable location in the system. Make sure the heater is securely mounted and level.
If you're using a U-shaped heater, like the U Shape Stainless Steel Heating Tube, you'll need to position it so that the water can flow through it properly. The heater should be installed in a way that allows for easy access for maintenance and inspection.
Step 3: Connect the Pipes
Now it's time to connect the heater to the pipes. Start by applying the pipe sealant to the threads of the fittings. Wrap the Teflon tape around the threads in a clockwise direction, making sure to cover all the threads. If you're using a liquid sealant, apply it according to the manufacturer's instructions.
Next, attach the fittings to the heater and the pipes. Use the wrenches to tighten the fittings, but be careful not to overtighten them, as this could damage the fittings or the pipes. Once the fittings are tightened, check for any leaks by turning on the water supply and looking for any signs of water dripping or spraying.
Step 4: Connect the Electrical Wires
After the pipes are connected, it's time to connect the electrical wires. Before you do this, make sure the power is still off. Use the wire strippers to remove the insulation from the ends of the wires. Then, connect the wires to the terminals on the heater according to the manufacturer's instructions.
Once the wires are connected, use the pliers to tighten the terminal screws. Make sure the connections are secure and there are no loose wires. After you've connected the wires, use the voltage tester to check for any electrical current. If everything looks good, you can turn the power back on.
Step 5: Test the System
Now that the heater is installed and connected, it's time to test the system. Turn on the power to the system and set the temperature controller to the desired temperature. Wait for the water to heat up and check the temperature using a thermometer.
Monitor the system for a while to make sure everything is working properly. Check for any leaks, unusual noises, or fluctuations in the temperature. If you notice any problems, turn off the power and check the connections and the heater for any issues.
Troubleshooting Tips
Even if you follow all the steps correctly, you might encounter some problems during the installation or operation of the heater. Here are some common issues and how to fix them:
- Leaking pipes: If you notice water leaking from the pipes, check the fittings to make sure they're tightened properly. If the leak persists, you may need to remove the fittings, apply more sealant, and reinstall them.
- No heat: If the heater isn't producing any heat, check the electrical connections to make sure they're secure. You may also need to check the temperature controller to make sure it's set correctly. If the problem persists, there could be an issue with the heater itself, and you may need to contact the manufacturer for further assistance.
- Overheating: If the water is getting too hot, check the temperature controller to make sure it's set correctly. You may also need to check the thermostat to make sure it's functioning properly. If the problem persists, there could be an issue with the heater's power supply or the wiring, and you should contact a professional electrician.
Conclusion
Installing a water heating tubular heater in a closed-loop water system isn't too difficult if you follow the right steps and use the right tools. By choosing the right heater for your system and following the installation instructions carefully, you can ensure that your system operates efficiently and safely.
If you're interested in purchasing a water heating tubular heater or have any questions about the installation process, feel free to reach out to us. We're here to help you find the right solution for your needs and provide you with the support you need throughout the installation and operation of the heater.
References
- Manufacturer's installation manuals for water heating tubular heaters
- Plumbing and electrical codes and standards